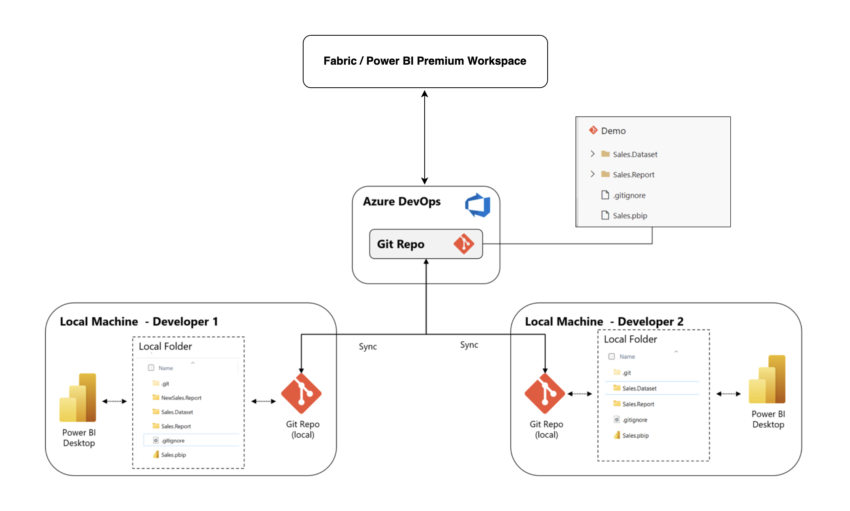
A game changing feature came out this year. It’s the native Git integration in Power BI. It’s the feature that so many Power BI professionals have been waiting for.
Previously, we still had a solution for implementing version control in Power BI, thanks to open source tools such as pbi-tools. But it was not easy to implement a version control solution, especially for those who aren’t as technical. Because you first had to find another tool that might potentially do what you want and learn it well enough to implement it. I myself didn’t even give it try even though I’ve worked with Git for quite a while at this point.
The exciting news is that with this new Git integration feature, the process of setting up version control became much simpler. And I’ll walk you through step-by-step, exactly what you need to get started with Git integration in Power BI. So, you’ll be all set after going through this tutorial.
The followings will be covered:
- Set up a Git repository in Azure DevOps (Azure Repos)
- Authenticate Azure Repos on your local machine
- Create a Power BI report and save it as PBIP (Power BI Project) locally in Git
- Save and push changes to Azure Repos
- Create a premium workspace and enable Git integration
- Commit, push, and merge on-going changes
Prerequisite
- Basic knowledge of version control and Git
- Installation of Git on your machine
- Power BI premium or Fabric license
- Azure DevOps account (first 5 users are free for Azure Repos)
***Note that I’m using a windows VM running on a Mac machine for this tutorial***
1. Set up a Git repository in Azure DevOps (Azure Repos)
1. Go to https://dev.azure.com and choose your organization for the project.

2. Add the project name and click “Create”.

2. Authenticate Azure Repos on Your Machine
1. Open up your terminal or VSCode. If you’re using VSCode, jump to “Steps for VSCode“. In your terminal, create a new folder and navigate to it.

Now, we want to initialize Git and add a remote repo, which is what you just created in Azure DevOps.
3. Go back to your Azure DevOps project. Click on “Repos” on the navigation pane found on the left side of the screen. We’ll need the credentials to connect this Azure DevOps repository to your machine. Click on “Generate Git Credentials” and copy the password and keep it somewhere for now. The password changes every time you click on it, so just be aware.


4. Also, copy the URL of your remote repository. Technically, you could use either “HTTPS” or “SSH”. But setting up SSH on your machine is more complex and for another post. In this tutorial, we’ll use “HTTPS”.

5. Go back to your terminal. Initialize Git and add a remote repository. Use git init and git remote add <shortname> <url>. You’ll be asked to enter the password when you’re trying this for the first time. That’s when you type in the password you just copied a minute ago in step 3.

By this point, you’re ready to start adding files in this folder for version control!
On the side note, you can combine the steps of initializing git and adding the remote repository by using git clone <URL>. You’ll still get asked to type in the password on your first try though.
Steps for VSCode:
1. In your Azure DevOps project, click on “Clone in VS Code”. That will take you to VSCode.

2. Create a new folder as you’re prompted. And select it as the repository destination.


Create a Power BI Report and Save It as PBIP (Power BI Project)
I’m using a Power BI report or data model that contains Contoso dataset. You can use whatever you have. Let’s open that up and save as PBIP in our project folder.
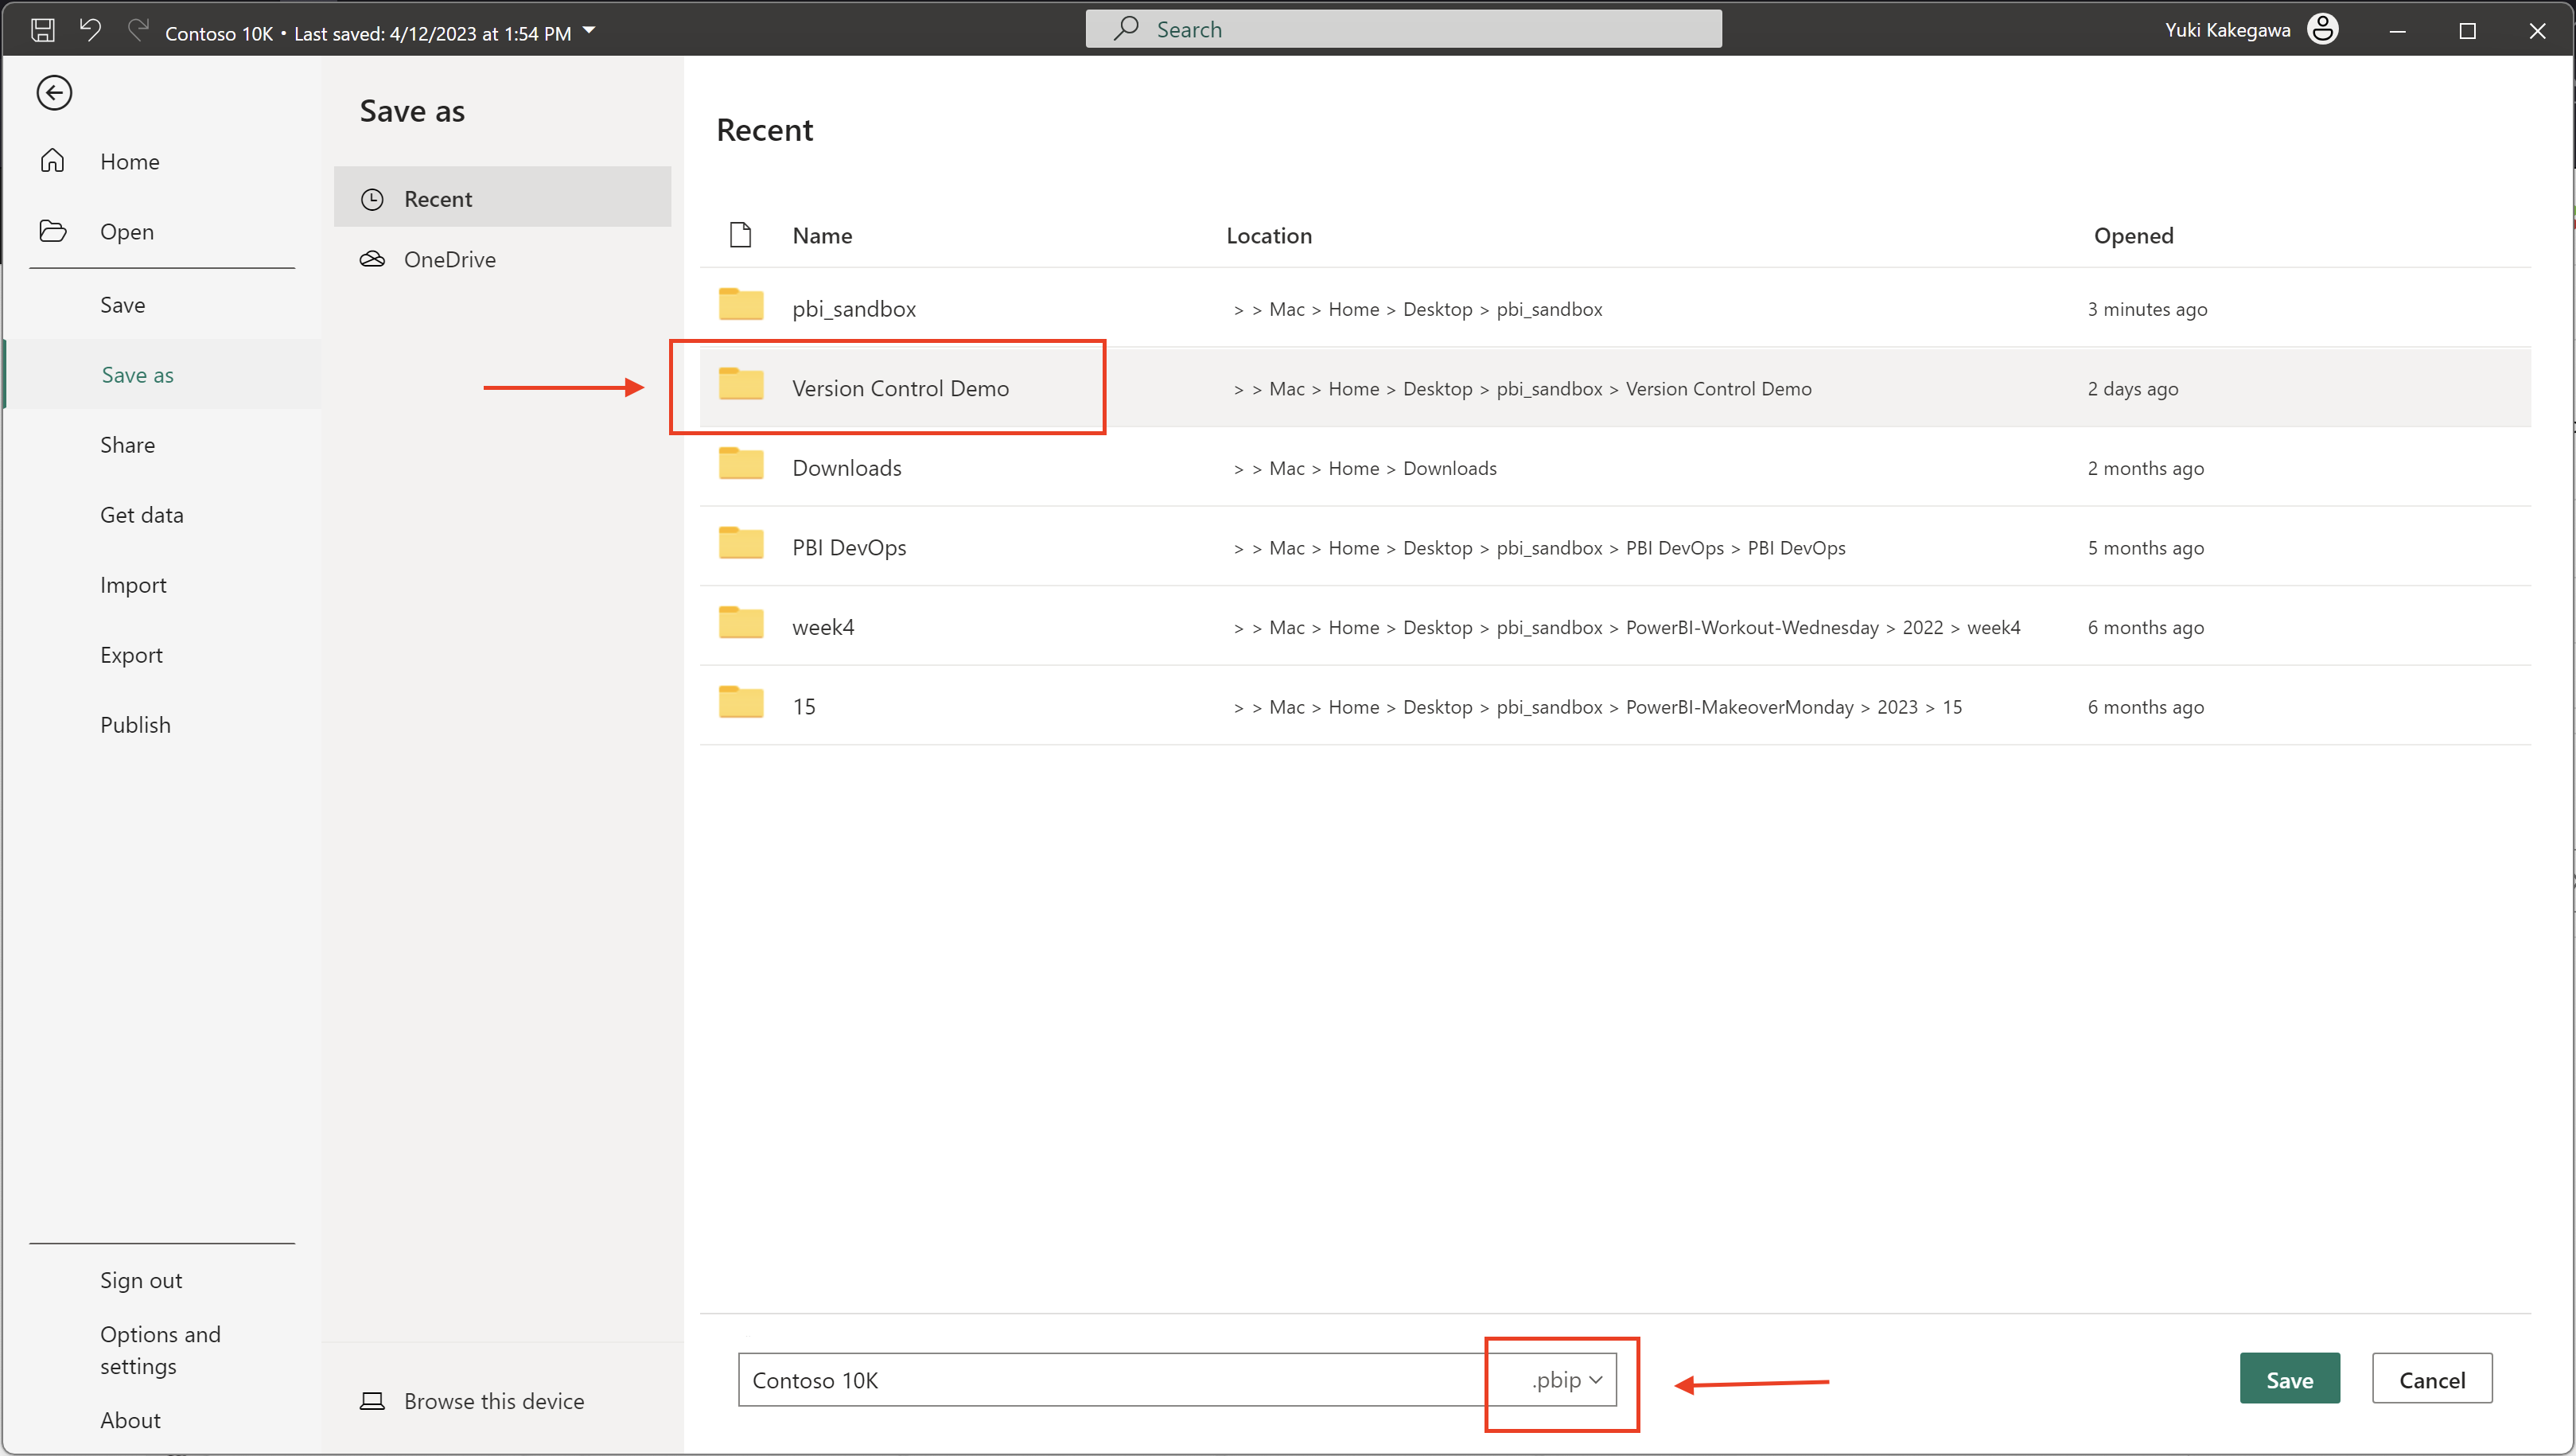
Your files saved in the folder:

Save and Push Changes to Azure Repos
Now that we have our Power BI report saved in PBIP format that’s version control-able, we can commit and push our changes to Azure Repos. If you’re using VSCode, jump straight to “Steps for VSCode“.
1. Save and commit changes
Git commands:
- git status (check tracked and untracked files)
- git add <your files> (add files to track)
- git commit -m <your comment> (commit the tracked files with a comment)
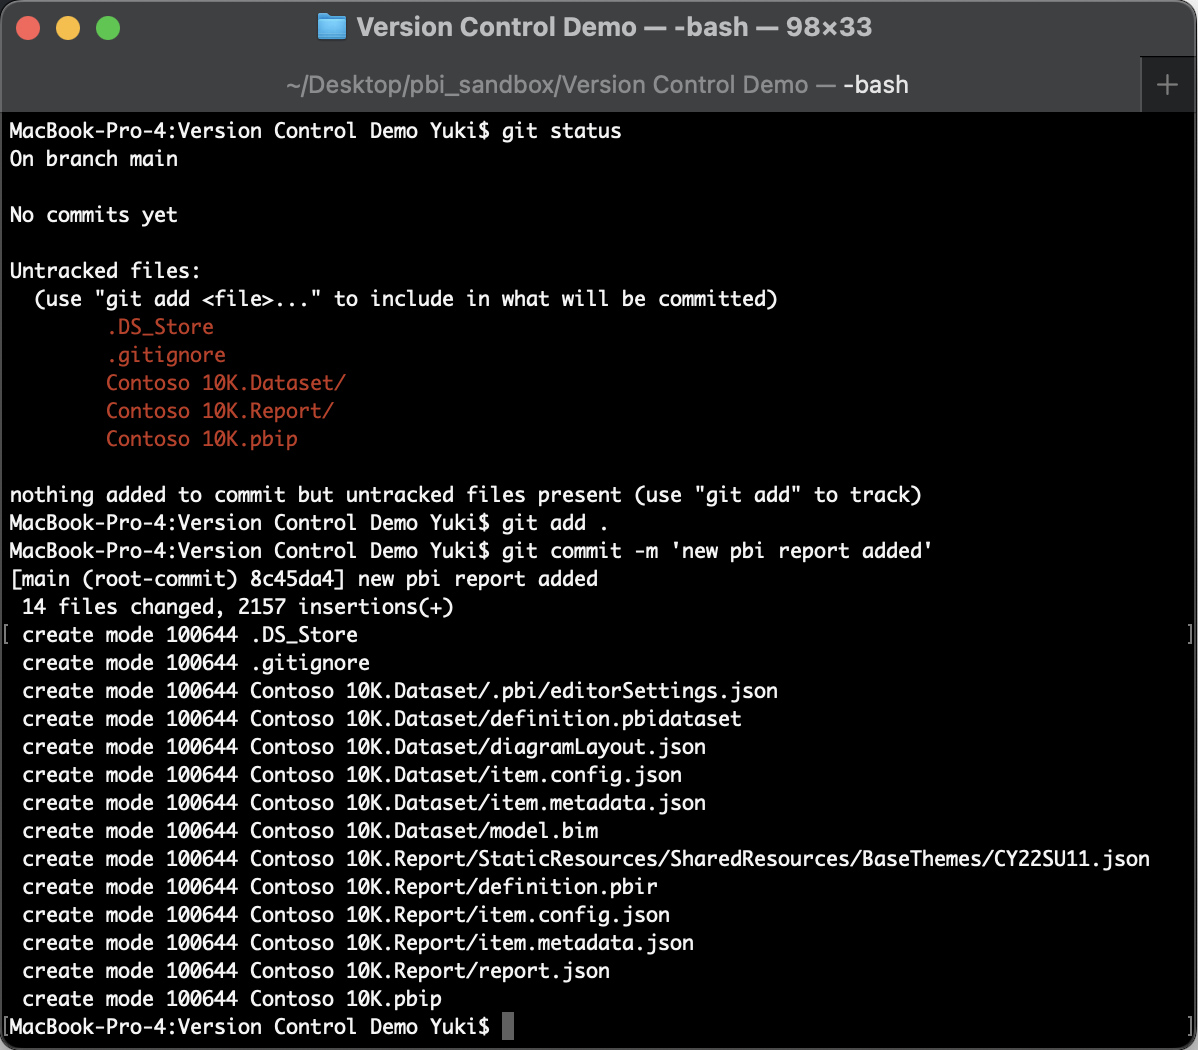
2. Pushing changes to the remote Azure Repo.
git push does the job, but when pushing the changes for the first time, you’d need to specify where you’re pushing them to. Use git push –set-upstream version_control_demo main

3. Head over to Azure DevOps, notice your files are uploaded successfully.

By this point, you’ve successfully implemented version control in Power BI. But Git integration in Power BI goes one step further by automatically syncing these files in your workspace.
Steps for VSCode
With VSCode, you can see changes, commit and push changes just with clicks, no code needed. Basically, you can do everything as you click around.
What you need to do in this case are the followings:
- Switch to the source control tab. You should see all the changes.
- “Commit” changes.
- “Push” changes.

After you committed your changes, go back to Azure DevOps/Repos and make sure files new appeared.
Create a Premium Workspace and Enable Git Integration
1. Head over to app.powerbi.com and create a workspace.

2. Make sure you fill out the name and choose premium or fabric capacity under “Advanced”.

3. Once you created the workspace, go to workspace settings and configure your Azure DevOps/Azure Repos.

4. After you clicking on “Connect and sync”, the workspace starts syncing your files that exist in your Azure DevOps/Repos. When it’s completed, you’ll see your Power BI files right in the workspace.

Once you configured the Git integration in your workspace, all the changes made to the main branch will take effect in the workspace.
Commit, Push, and Merge On-Going Changes
Let’s see how collaborations between multiple developers can happen with this new Git integration. You typically don’t work on the main branch because that’s where all the accepted changes are made. What you do is to create your own branch per feature/project per team member.
That way, when you push your changes, you can have the process where your team or peers review and merge the changes to the main branch. Only after that, your changes can take effect in your target workspace.
1. Create your own branch.

2. Let’s add a bar chart to the report. After saving the change, you’ll see the untracked file in git.


Since you added a reporting element, a file in your PBIP responsible for that has been changed.
3. Now, let’s commit the change and push it to Azure DevOps/Repos.

Here, I made a simple mistake of using only git push, where I needed to still add –set-upstream version_control_demo some_feature portion since this is my first time pushing changes from my branch. It doesn’t yet know where to push the changes to.
Let’s type in the correct git command:

4. Let’s head over to Azure DevOps/Repos and see the change. Notice you now have a little pop up that prompts you to create a pull request. A pull request is where you request to merge your change into the main branch. Typically, your team reviews it and confirm the merge, but in this case, we’re doing this all by ourselves. To proceed further, click on “Create a pull request”:

5. You’re now brought to “Pull request” tab. You can see the overview of your pull request, as well as what changes were made to which files. You can even add reviewers and tags.
Overview:

Files:

Commits:

Click on “Create” to proceed.
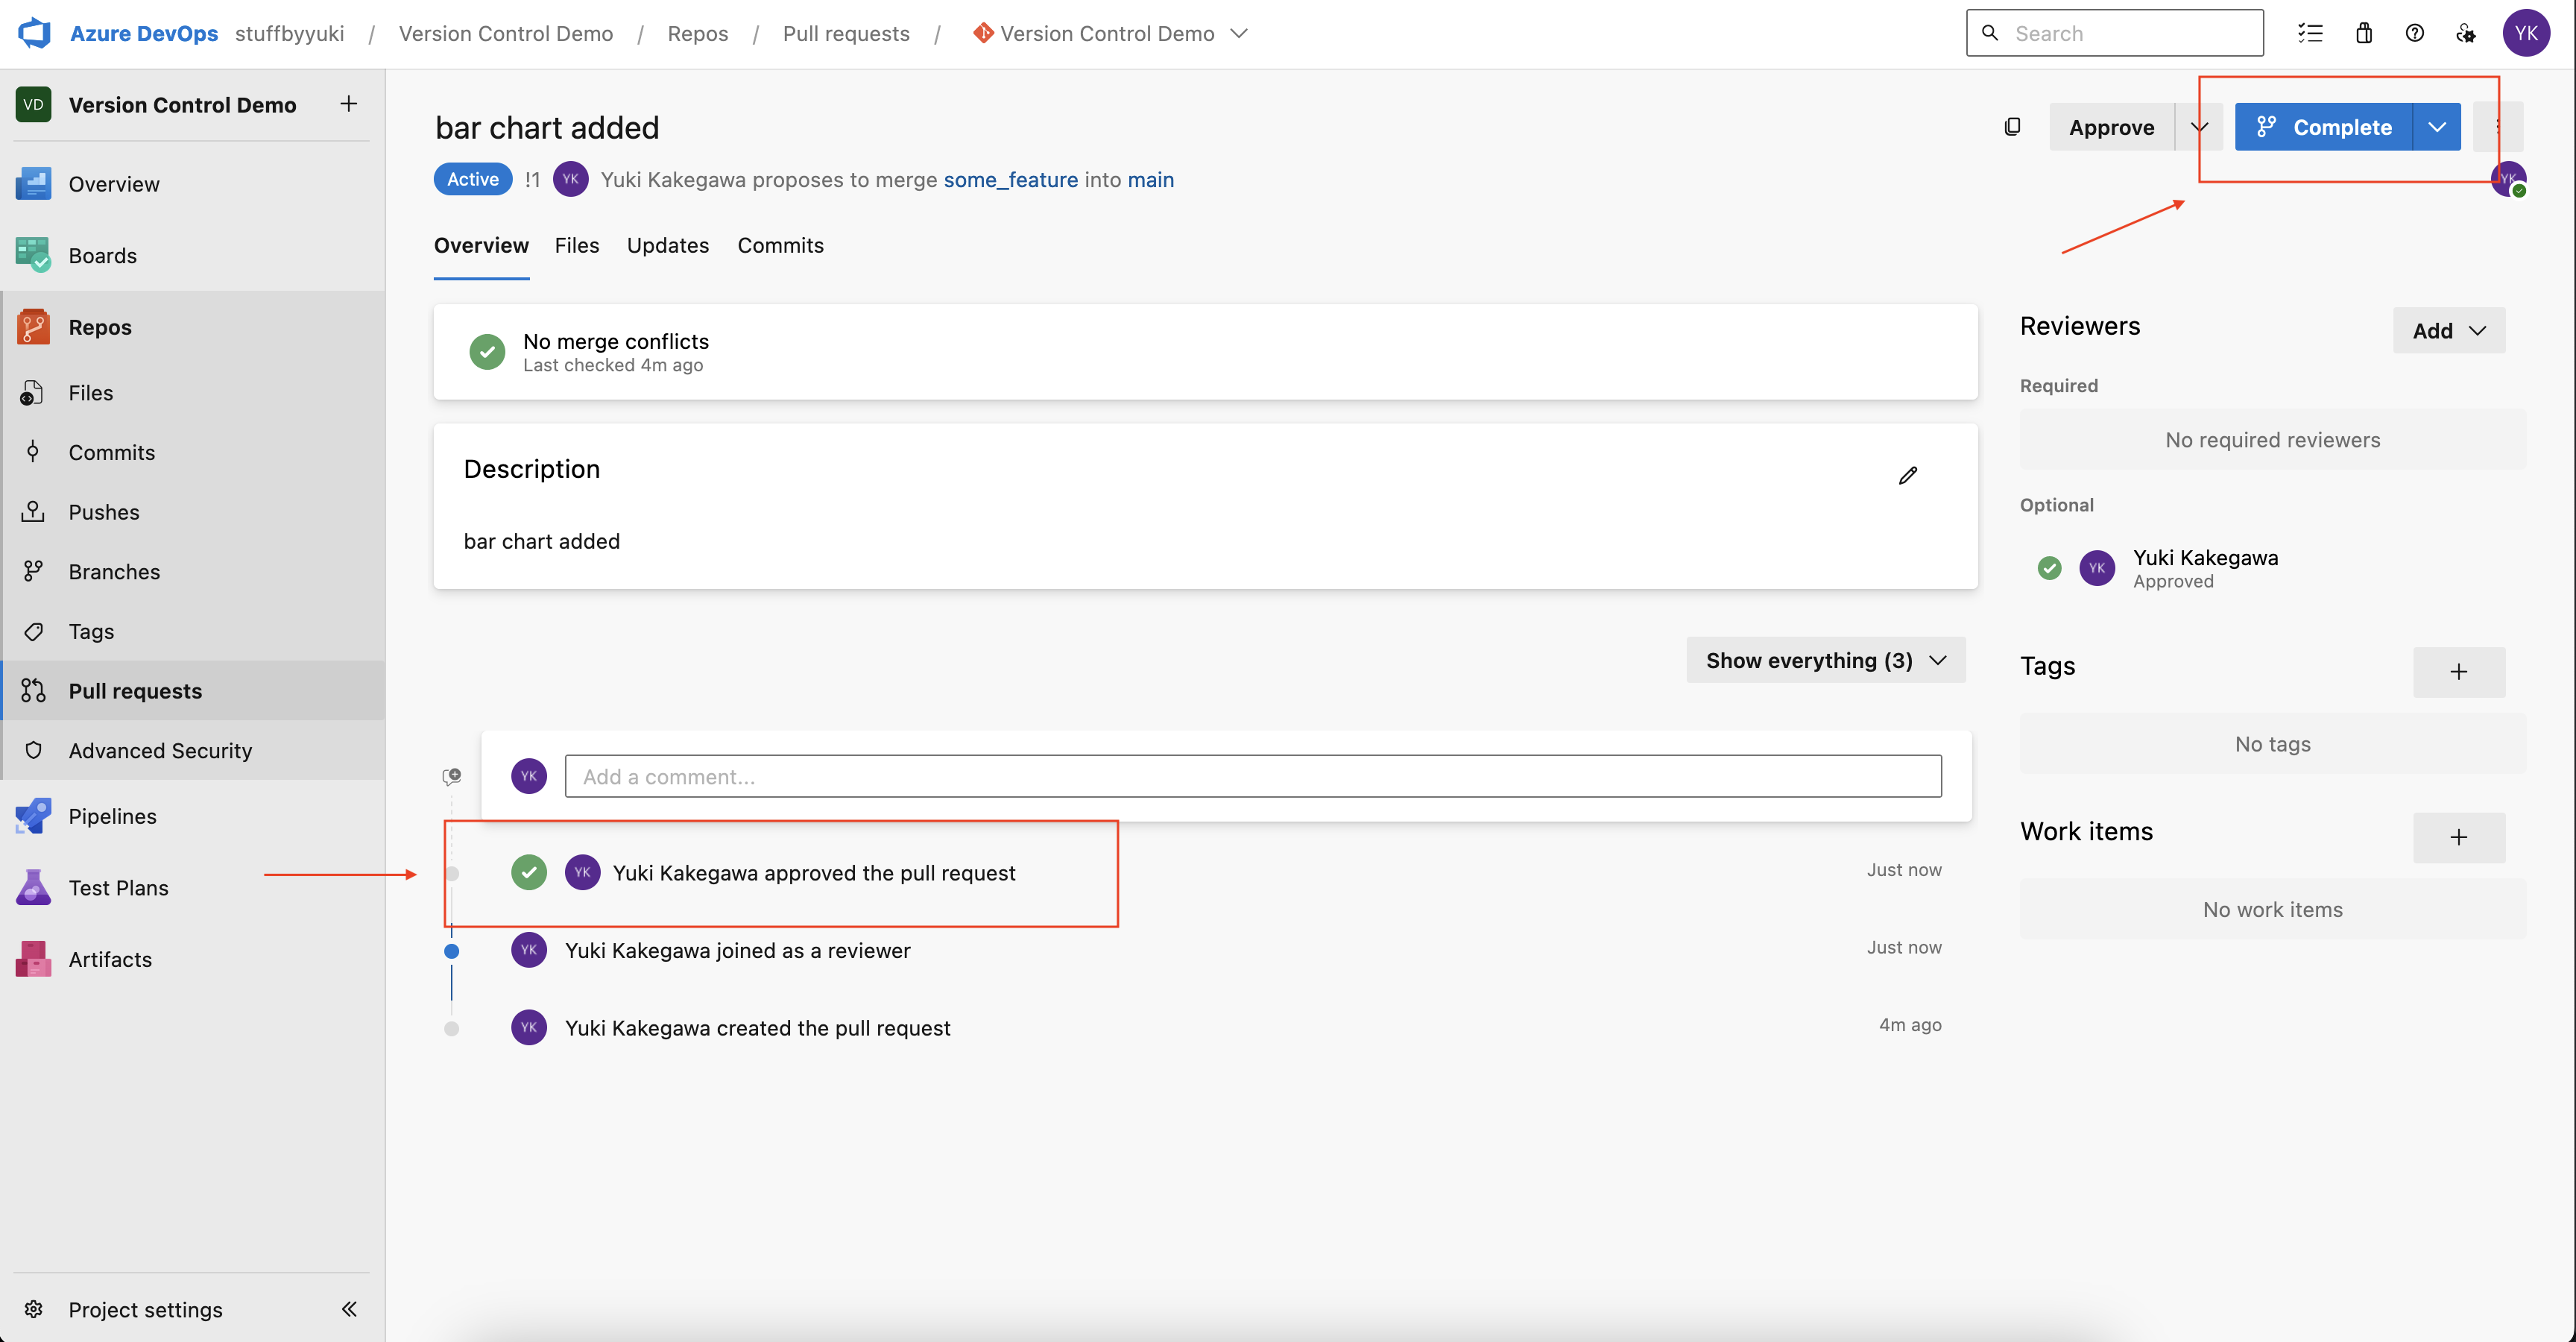
6. Here we are at the approval stage. Just like the step above, you can check changes made, commits, etc. If you’re a reviewer, and the change looks good, then you click on “Approve”. You have other options such as “Approve with suggestions” and “Reject”.
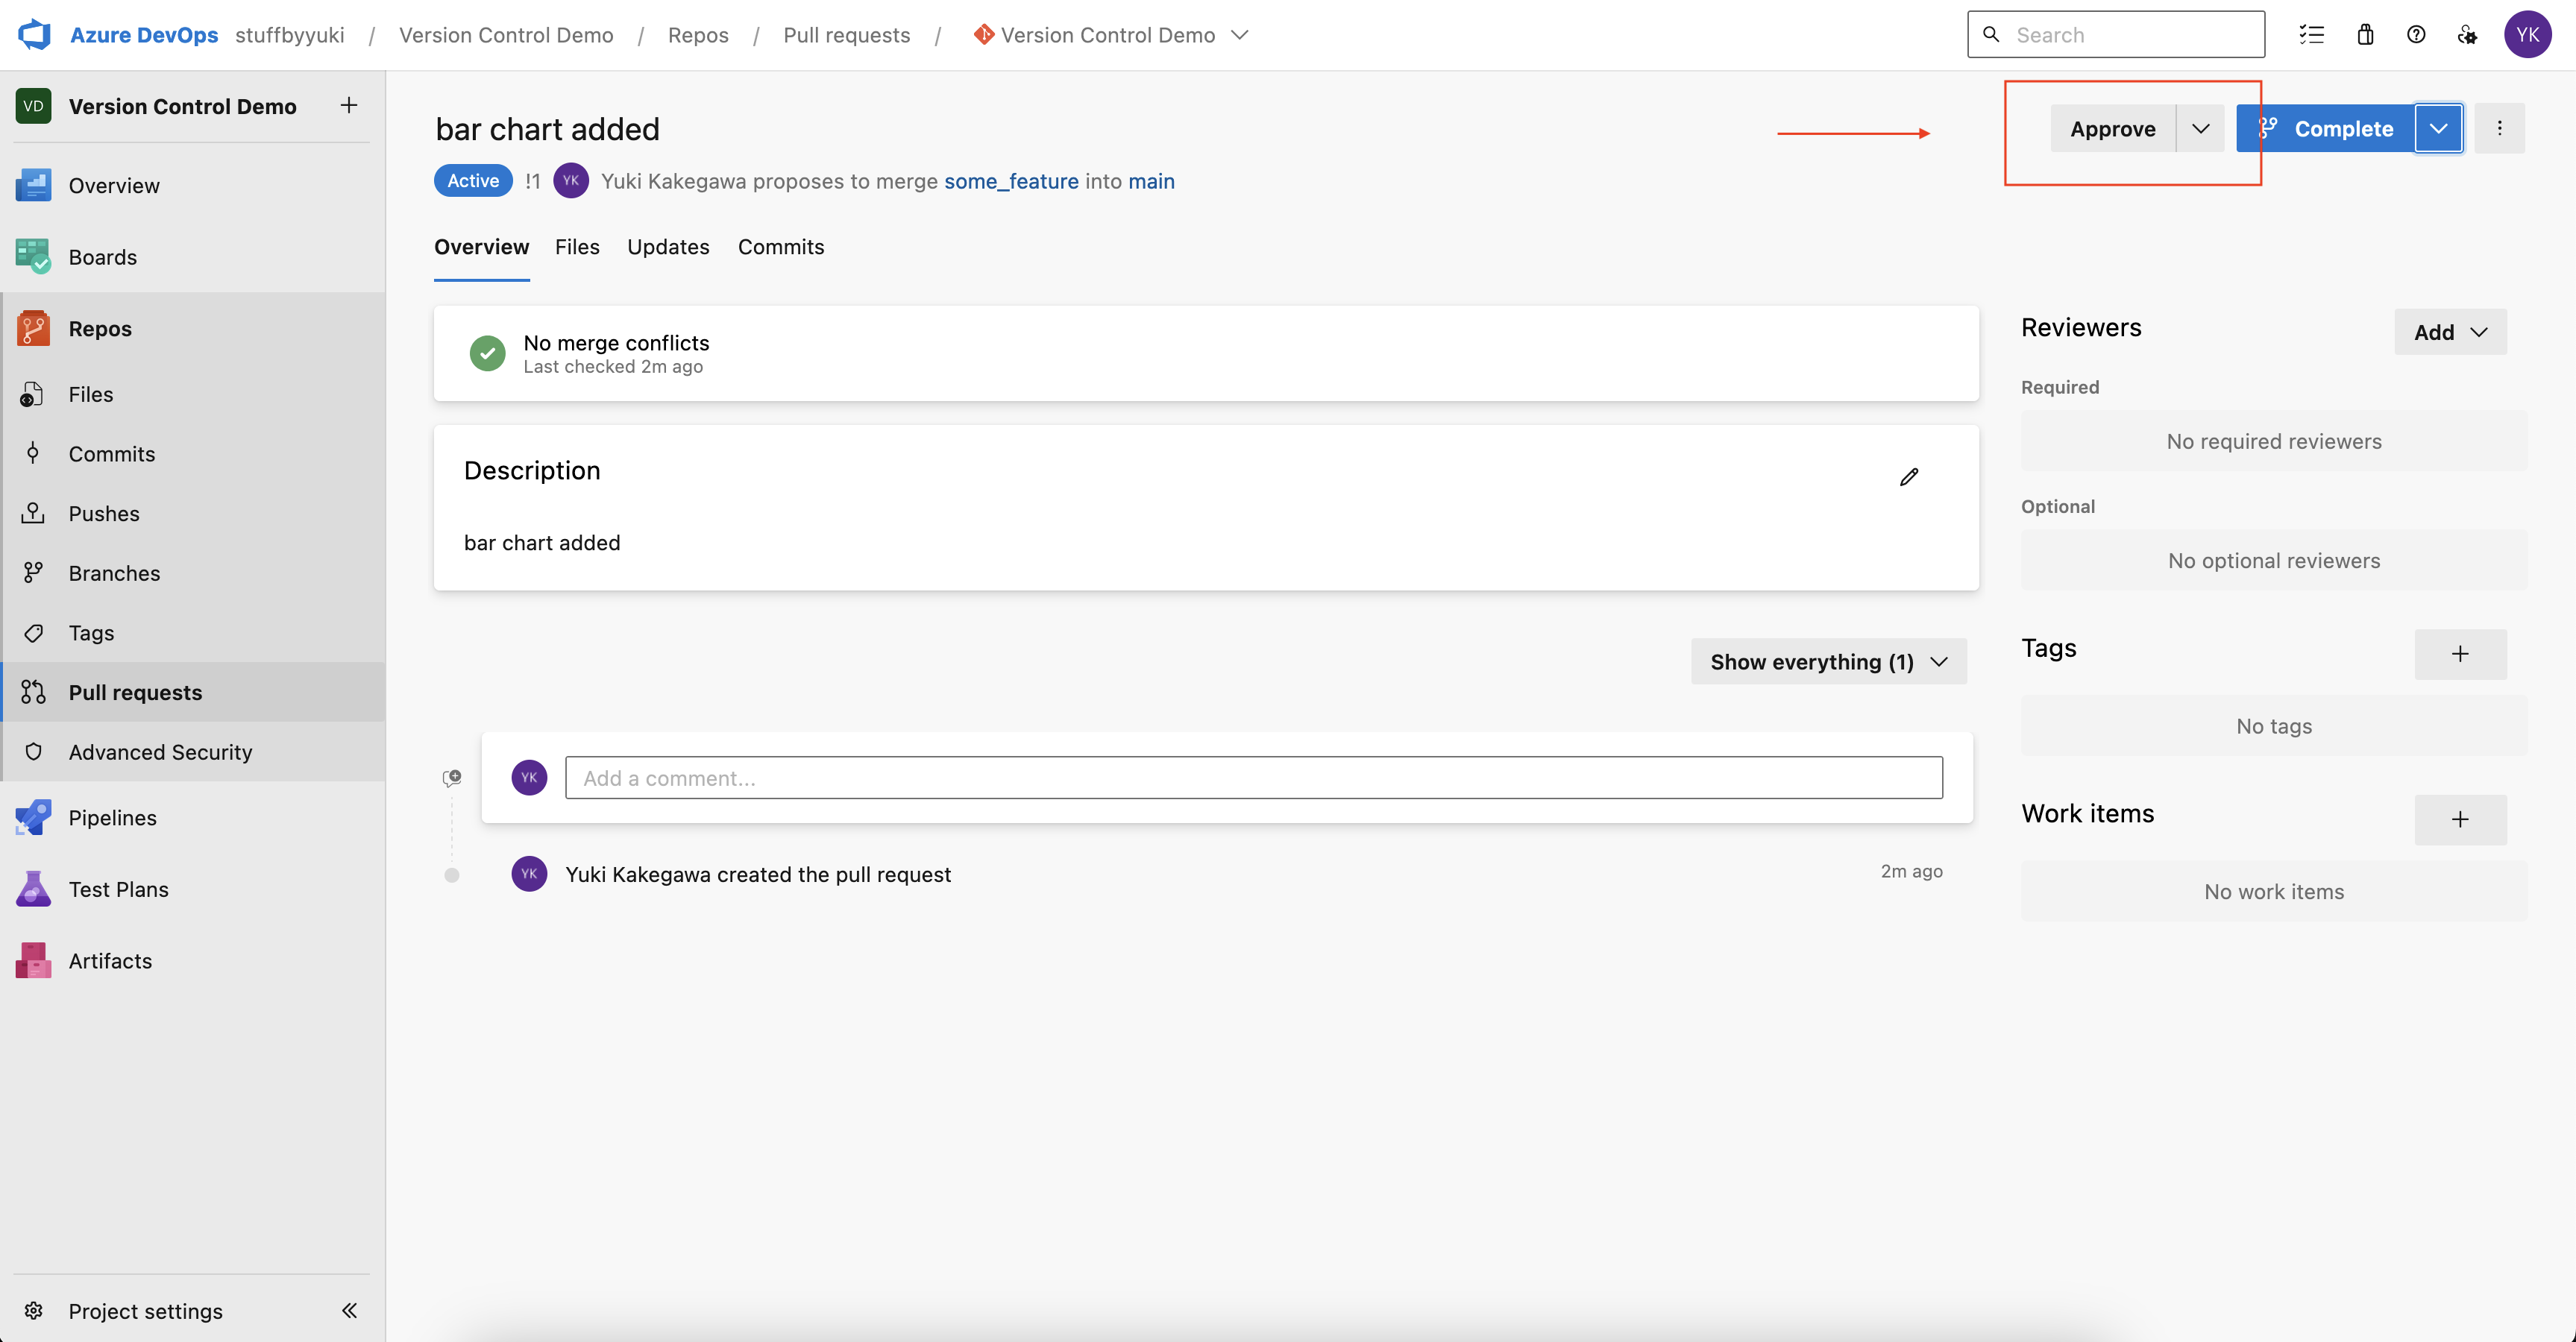
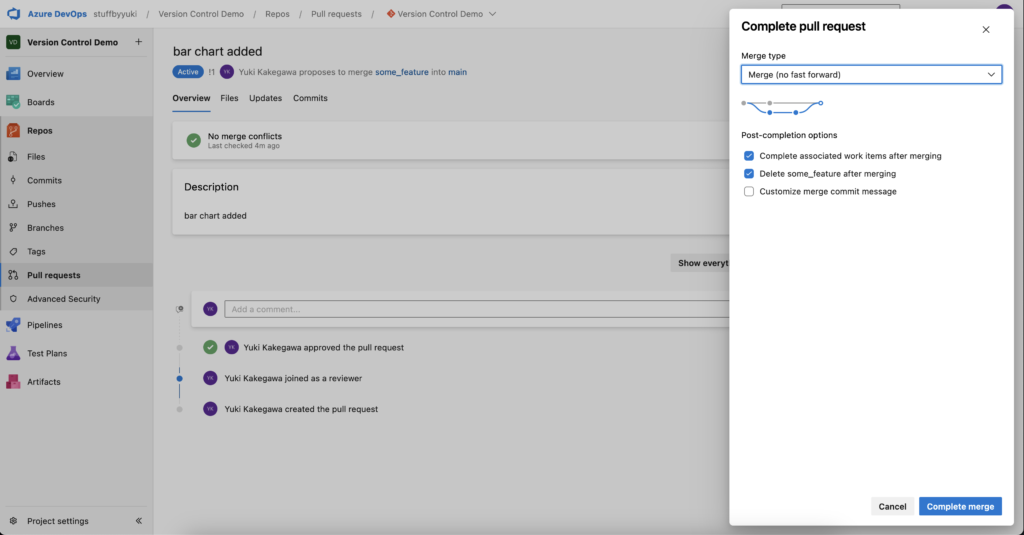
7. Now, the change is ready to be merged. Click on “Complete” and then “Complete merge”.
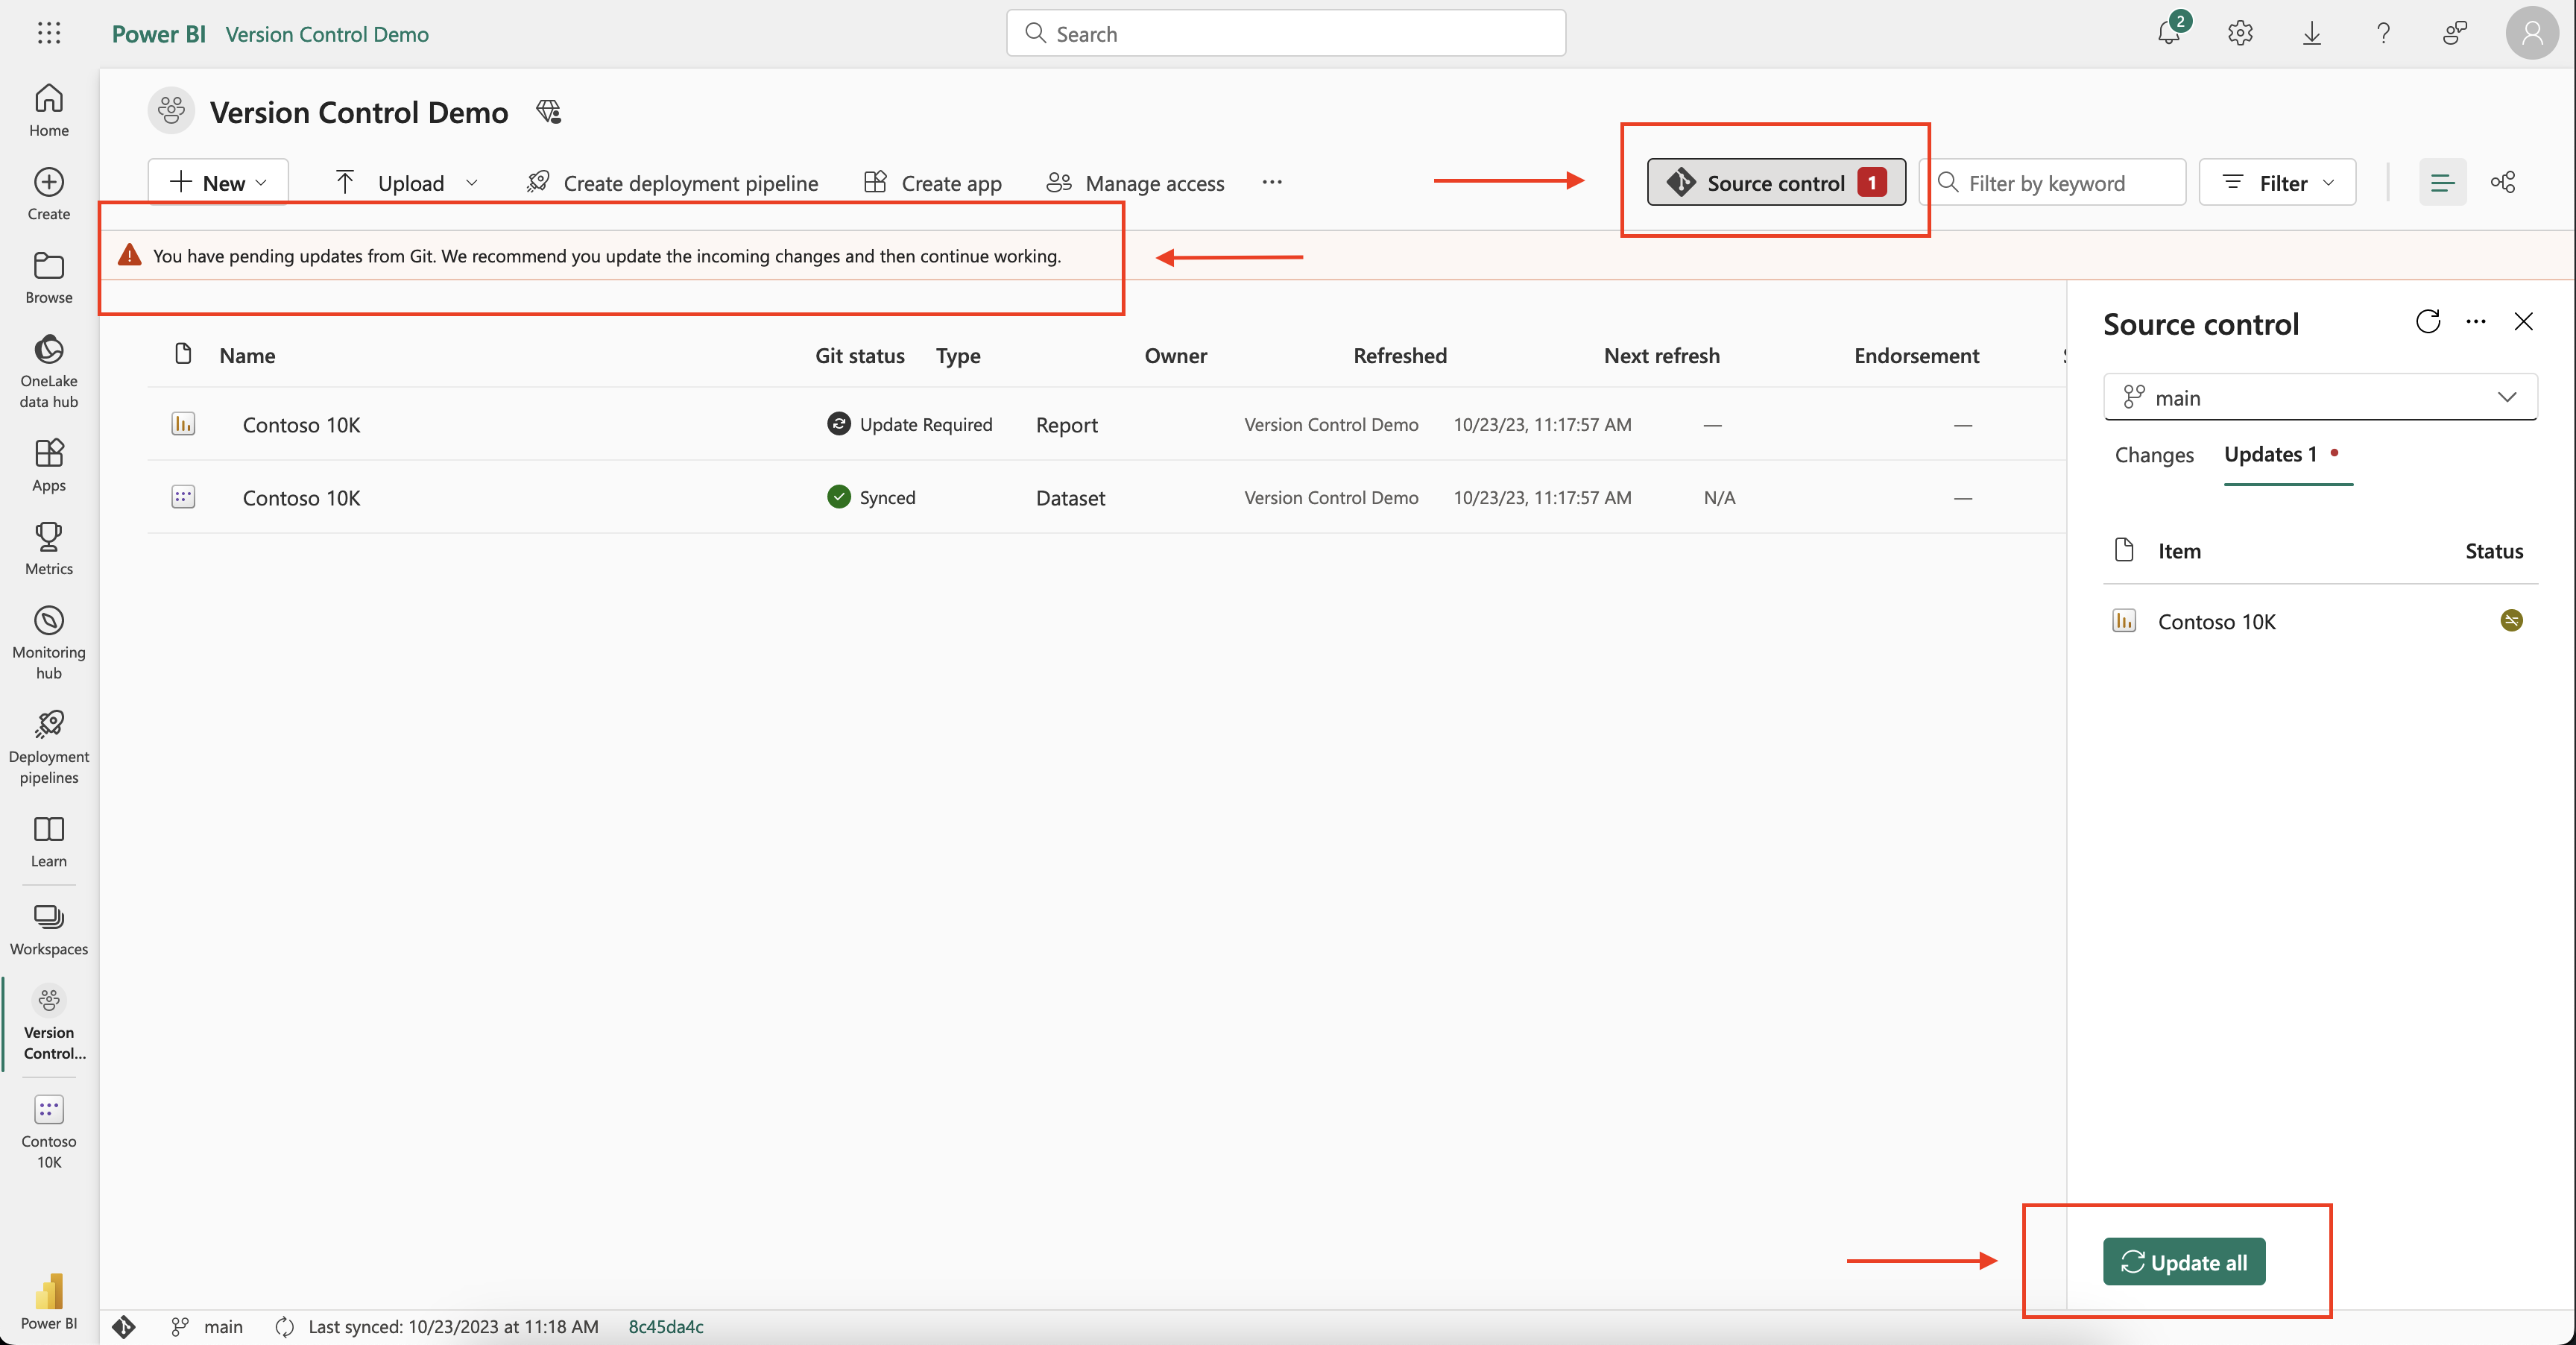
8. Go to your workspace and notice there is a pending change. Click on “Update all”.
9. Finally, you go to your report, and see the change.
***Note that you need to refresh your dataset first. Because what you’re doing with this Git integration is the deployment of the metadata***

Summary
After doing all the steps above, you should have your QA process to move your reporting solution from Dev, Test, to Prod workspace with deployment pipeline. Git integration + deployment pipeline gives you a seamless BI project workflow.
Hope you were able to see how impactful this new Git integration feature is and are ready to use it in your project. Especially, in teams where multiple developers work on the same Power BI project, the benefit of this Git integration feature is tremendous. PBIP (Power BI project) in itself is a great feature, but also being able to version control and integrate it natively in your workspace steps up your workflow!
P.S. I work as an independent consultant and help companies implement Power BI solutions. Feel free to DM me on LinkedIn or email at yuki@stuffbyyuki.com if your team needs help with Git integration in Power BI.
